Convert OEM Version of Windows Server 2003 to a VMWare Virtual Machine (P2V)

2 Comments

One thing that’s a problem with converting to a vm, is if you have an OEM version of Windows installed. An OEM license is tied to the hardware that you have it was installed on which means that you cannot move this to another machine. The problem arises when you have been using that server for years, have a lot of software and settings on it, the hardware is getting old, and you need to convert it to a VM.  When you convert it to a VM, Windows Activation notices that an OEM license is installed on new hardware, and basically will not allow you to login and will shut the server down.  The most frustrating part about this is that you may have a valid open license,  but W2k3 does not allow you to upgrade the license by any conventional means.

NOTE: W2k8 DOES allow you to switch licenses, so if you have an OEM license installed, BEFORE you convert it, you simply need to right-click on Computer, go to properties, and click “change key” towards the bottom, enter your valid key, and it should convert with no licensing problems.

My environment is I am using VMWare ESXi, 5.x

NOTE: This should be done in a test environment only after a valid backup to your server.  I am merely providing you with instructions that worked for me. They may not work for you. I am not responsible if this does not work or something does not work properly for you. It shouldn’t be a problem since you will not be altering the original server, and if something goes wrong or you run out of time, you can just delete the VM and turn the original machine back on.  Just in case always have a backup of your machine before you try anything.

To do this you must have the following, if you don’t have these, then don’t start the project:

  1. A valid open Windows 2003 license for either the 32bit or 64bit version that you are converting to a virtual machine.
  2. A valid W2k3 Volume License CD or ISO.  You may need use Disk 2 of the server install so keep that in mind.  If you’re using ISO’s you should mount both of the disks before you start the VM, that way you don’t have to worry about it.
  3. Download VMware-converter  (I used version 5.0.0-470252)
  4. Obviously a working vmware server.
  5. A timetable of around 3-5 hours depending on how big your server takes to convert, your internet connection speed to download/install the updates.

Here are the steps:

  1. Install all Windows security updates to your W2k3 installation before you do this and make sure it is working properly after. This is important because you will most certainly need to reinstall all of these updates later before your server works properly.
  2. Use vmware converter to convert your server to a virtual machine.
  3. If possible shut down your old W2K3 server.
  4. If using ISO Files, upload them to your datastore (do this by using vsphere client to connect to your VMWare server, click on the Summary tab, Rt-Click on your Datastore under the resources column, and choose browse datastore)
  5. Right click your newly created VM, and click “Edit Settings”
  6. Click “Add” and choose “CD/DVD Drive”
  7. Add the CDRom of your virtual server, OR If you have iso files, then choose the path to the ISO files that you copied. If you have disk1 and disk 2, then add 2 drives. Make sure that Connected And/Or Connect at Power On is checked.
  8. While still in the “Edit Settings” screen, go to the “Options” tab, then click on “Boot Options” and click the box to force you into the bios settings.
  9. At this point you may want to shut down the original server so there are no conflicts.
  10. Open the console for the VM and start the machine
  11. It should boot to the BIOS, Go to boot options \, and make sure your cd rom is the first boot device.
  12. Save settings and exit, Let it boot, press any key to boot from the CD
  13. Choose “Install”, then when it finds your operating system, then repair it.
  14. It will now do all of the install, and reboot, and ask you to enter the CD Key in which you enter your Volume License key, let it run the install, it should take you to the login screen and allow you to login
  15. Now you want to install VMWare Tools. Do this in Vsphere Client by going to the VM menu, then Guest, then “install/upgrade VMWare Tools”. it takes about 20 seconds for the install dialogue box to come up so be patient.
  16. Now you need to install updates from Windows update until there are no more (even with the SP2 install, there were a ridiculous amount) and if everything goes ok you should be good. If it gives you an error when clicking Windows Update See The Notes Below.
  17. Change the IP address in Windows to that of the old server, remember to  shut down the old server.

Note: When changing the IP address in Windows it will give you an error about a hidden network adapter, that was the adapter that was part of your physical box on your other machine.

Note: On one machine, when trying to click Windows Update from the IE Tools menu I got an error “the requested lookup key was not found in any active activation context”  To resolve this I opened up a run prompt, navigated to c:\windows\ie8\spuninst\  and ran spuninst.exe. This uninstalled IE8 and restored the update functionality in IE6.

IPSec does not start

1 Comment

On a Windows 2003 Server I had someone “clean” my registry of their old program for an upgrade that I couldn’t complete.  All I had to do was wait after hours and reboot the server. Well when I went to reboot the server a lot of my services would not start. Including Microsoft Exchange IS  and Exchange MTA stacks (nightmare!!!)  One of the things I noticed was that the first error to pop up in the event viewer was event id 4292

“The IPSec driver has entered Block mode. IPSec will discard all inbound and outbound TCP/IP network traffic that is not permitted by boot-time IPSec Policy exemptions.”

If I went to services.msc and tried to start the service manually, it would give me the error:

“Error 10048: only one usage of each socket address (protocol/network adress/port) is normally permitted.”

First as a temporary fix  you might try the following for the heck of it which refers to it being caused by an MS update..

http://www.seasideit.com/2010/04/ipsec-service-wont-start.html

But if that doesn’t work try to perform this KB article which fixed my problem completely. Please note that you HAVE to reboot after this (i tried not rebooting and tried to just start the service and it didn’t resolve the problem). Before you delete the key that Microsoft instructs you to delete in the following article, you might want to right click and export it to a file just in case.  As a disclaimer I don’t take any responsibility for any registry corruption or errors.

http://support.microsoft.com/kb/912023

Another thing I read was that you can disable the IPsec service and reboot server, but that would be as a last resort.  Good Luck.


Solve Proxy Bypass Problems

12 Comments

I noticed that a lot of people were bypassing my proxy using Firefox Portable and other standalone browsers.  I am using a proxy installed on a machine that is not directly attached to my default gateway, so I have them pick up the proxy address from wpad, and lockdown the proxy settings page in IE through Group Policy.

A simple solution to people bypassing your proxy, is to put an entry in your firewall to only allow HTTP and HTTPS traffic that originates from your proxy server.  If you’re not administering a very large network this is ideal.  Another advantage, since it is not specific to just Firefox, it will allow you to catch any browser that users throw at it and force them to put in proxy settings to use the internet.  This also solves the problem if they try to get around the proxy by modifying their “auto detect proxy” settings.  Since Group Policy cannot lockdown the proxy editing page of every browser, and people always find clever ways to install the multitude of internet browsers out there, this will not allow them to simply bypass it by turning the “don’t detect proxy” setting off .   Here’s what the entries look like in a Sonicwall router to allow only http/https traffic that comes from your proxy  (the proxy server in this example is called flserver4.)

bypassproxy

Once you have a rule like the above setup, you can add a few exceptions in for your servers, etc. by placing an “allow” for those addresses with a lower priority than the deny.  In the example above, I created an Address Group and can add IP addresses/hosts to it whenever I need. I would put an allow entry in where the source is my Server IP, the destination is ANY, and the service is Http/Https, at a priority of 17/18, which would process before the deny.  To make it easier you can create a Service Group containing both HTTP and HTTPS ports so you don’t have to put every exception in twice as well as the address group to contain the hosts you would like to allow this way you do not have to create an entry for every ip address.

Obviously, The best way to use a proxy is to use two nics and place the server/device in front of your router, or use a content filtering solution that is installed on the router itself since all traffic leaving must go through this server/device to get out.  Sonicwall has one, Cisco has one on a certain series of routers.  However, if you have a proxy working on a standalone server that is not installed in front of your gateway so that all traffic has to pass through it, then the above solution should suffice. Everyone out there has a different setup so this will help when you do not have the luxury of having this type of setup.

There is a also an ADM out there that allows you to configure Firefox through Windows Group Policy, however, since Firefox standalone is not actually installed on the machine and does not contain registry entries, I’m not sure that this will work, so you might want to investigate that.  Another person has a great writeup on how to create your own.  If you need to enforce more than just proxy settings then you should take a look at it.

Locking Mozilla Firefox Settings

Here’s another writeup I had on autoconfiguration setup a little while ago that addresses how to set it up and contains links at the bottom on troubleshooting and concerns with using wpad.

Multiple Desktops On Windows

Leave a comment

Not sure how long this has been out, but I just came across a helpful tool. Those of you who use Ubuntu or most other Linux versions are familiar with multiple desktops. I was using the sysinternals suite to troubleshoot a file problem i was having, and I came across Desktops application that allows you to do this. It is ridiculously easy to use and you can set it to load on startup. You can also easily switch between screens with shortcut keys just like Linux.   It also has some limitations, such as you can’t close windows once they are created (need to logoff to close).  For more info or to download you can visit here or just get it as part of the sysinternals suite which contains great tools for troubleshooting and maintenance.

Windows 2003 Server WPAD AutoConfiguration Including Subnets

1 Comment

Recently I decided to push autoconfiguration proxy settings out to my clients via WPAD. The reason I did this is that I used to push them out via Active Directory Group Policy, however I have some computers on my network that are not part of a domain, and I wanted to be able to enforce our company’s web and security policies to them.  This was not extremely difficult, however, one problem that I ran into was that it would not work on subnets other than the one that my proxy was located on.  Here’ s how I was able to implement this and push it out to subnets:

First off I am using GFI WebMonitor 2010 for my web proxy. I like this product because it includes its own proxy server so I did not have to purchase ISA server in order to run this on. I use a hardware router so purchasing ISA just to run a web proxy seemed to be a waste of money.

To start off, this software makes it pretty easy to publish your WPAD to the network for computers to access. In GFI WebMonitor I just did the following:

This automatically creates your wpad.dat file and publishes it.

You can view the wpad.dat by going to http://wpad/wpad.dat  The wpad.dat has a lot of configuration info in it, but the gist of it is this:
function GetStandardProxy(url, host) { if(host == “127.0.0.1”) { return “DIRECT”; } else { return “PROXY 192.168.1.12:8080; DIRECT”; } }

Then I needed to create the entries in DHCP and DNS to point to the WPAD so browsers could find and use the proxy server. The main problem I ran into is that computers on the local network where the proxy is located picked this up automatically and gradually started redirecting to my proxy server, but computers on my other subnets would not pick this up. I assume that the router was blocking some sort of broadcast, so I decided to put the entries in both DHCP and DNS to circumnavigate this as there is a router or 2 that is controlled by another consultant.

In DHCP this is pretty easy to do although you need to add option 252. In DHCP, right-click on your server and click on “Set Predefined Options”, Click “Add”, for the code enter “252”, for the name enter “wpad” and for the “data type” enter “String”  Why its not there by default is baffling, but it’s easy enough to add.

Now for the DNS entry. Under Forward Lookup Zones, Enter a new alias (CNAME), call it wpad, and then point it the server that houses your wpad file.  This should replicate to your other DNS server.  For testing purposes just make sure that you do it on the first server listed when performing an IPCONFIG /all.

Now here’s the part that had me stumped for a while. I go to http://wpad/wpad.dat on a computer located on another subnet and you get a 404 page.  After doing some research I found out that microsoft blacklists this entry in DNS by default (?). The way to unblock it is to edit the following registry entry. At HKLM\System\CurrentControlSet\Services\DNS\Parameters open up “GlobalQueryBlockList” and delete the entry that says “wpad”. Then restart your DNS server.  Now go back to one of the computers on that subnet and then you should get the wpad.dat script.  (MS reference KB: http://support.microsoft.com/kb/2003485 )

There’s one more thing to do.  Go to your DHCP server, right-click and go to Scope Options, and select “252”, then enter your string value.  Mine is http://myserver/wpad.dat . Something to note on this address is that I read that it may be case-sensitive so just enter it lowercase to save you the headache.

That should be it. Here’s some reference and troubleshooting articles as well as some other sources where I pieced together all of the information from.

MS Lowercase Only
http://support.microsoft.com/kb/307502
Explanation of Blacklist
http://clintboessen.blogspot.com/2010/08/unable-to-resolve-wpad.html
MS Troubleshooting Automatic Connections
http://technet.microsoft.com/en-us/library/cc302643.aspx

Security info about WPAD and Man In the Middle Attacks.
http://perimetergrid.com/wp/2008/01/11/wpad-internet-explorers-worst-feature/

Using a 32bit Progress Openedge Driver with SQL Server 2008 on 64bit server

1 Comment

Disclaimer: this should only be tried on a non production server as it involves modifying the registry. At the very least test it thoroughly before trying.  I will not take responsibility for any problems that you may have with your SQL database

My setup is a Windows 2003 Standard Edition 64bit server, with Progress Openedge 10.2A installed, and from what I’ve read is that they don’t have a 64bit driver. So the problem is that the server is 64bit, but progress’ driver is 32bit. Another note (really not sure if this matters and don’t have the time to reinstall right now) is that I have SQL 2008 installed in 32bit mode so if this does not work for you, you might want to look into that.

I had a lot of trouble with this one, but I finally got it to work a few months ago.  I’ll post how I got it to work.  The key to my frustrations was I did not have SQL 2008 Service Pack 1 installed.  MS totally dropped the ball on the ODBC wizard and forgot to include the necessary information  on the wizard to allow you to connect to an ODBC source using the .NET framework driver for ODBC.  I’ll show you how to do it in the following steps.

There’s a few things I had to do to get this to work.  The first part is that I had to create a 32bit registry entry:

Create a new text file  with the following information in it to be imported on the Windows 2003 64bit server. (remove the ***start*** and the ***********end******* )

******************************start*********************

Windows Registry Editor Version 5.00

[HKEY_LOCAL_MACHINE\SOFTWARE\Wow6432Node\ODBC\ODBCINST.INI\ODBC Drivers]

“Progress OpenEdge 10.2A driver”=”Installed”

[HKEY_LOCAL_MACHINE\SOFTWARE\Wow6432Node\ODBC\ODBCINST.INI\Progress OpenEdge 10.2A Driver]

“Driver”=”C:\\Progress\\OpenEdge\\bin\\pgoe1023.dll”

“Setup”=”C:\\Progress\\OpenEdge\\bin\\pgoe1023.dll”

“DriverODBCVer”=”3.50”

“APILevel”=”1”

“ConnectFunctions”=”YYN”

“CPTimeout”=”60”

“FileUsage”=”0”

“SQLLevel”=”0”

“UsageCount”=”1”

***********************end*********************

Then I saved it as a “.reg” file so when it is double clicked it will import into the registry.

Next we have to create the ODBC Entry using the 32bit version of the ODBC Data Source Admin.  “Go to C:\WINDOWS\SysWOW64\odbcad32.exe”  (assuming your win install is on C:\ )  and create your data source, obviously choosing the Progress Openedge 10.2A driver.   I named mine “MySystemDSN”

Now, that we have that setup, we need to run the 32bit version of the SSIS Import Wizard.  We find this in the “D:\Program Files (x86)\Microsoft SQL Server\100\DTS\BinnDTSWizard.exe”  (assuming that SQL is installed on your D drive.)

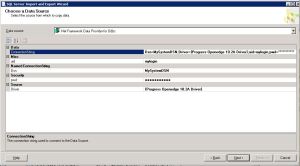
Now using the wizard choose the following and setup you want to enter a connection string like so.  I keep this in an easily accessible file so I can quickly paste it in at any time.

Dsn=MySystemDSN;Driver={Progress Openedge 10.2A Driver};uid=mylogin;pwd=mypasswd

32bit odbc wizard

As soon as you paste it in, all of the fields in the wizard  magically appear (why they’re not there to begin with is  baffling to me)  If you do not have SQL 2008 SP1 Installed, these would not pop up thus not allowing you to connect to the database. If I remember correctly it would say something like “you must enter the required fields” or the connection string needs a password or something to that affect.

You can go through the rest of the wizard and import the data successfully.  One thing that I should note. Is that it wasn’t properly recognizing dates. on the import  They would show up as a data type of “24” or some number like that, so I had to change them to a date datatype.

I don’t know a ton about Progress Databases except how to fix SQL Width problems and export a table to a csv file.  I basically import relevant data and tables from our ERP system which is a Progress database which allows an ODBC connection and write queries against the data. Therefore, I might have a tough time answering progress db specific questions.

One note is that if you plan to run these in a SQL Job, when creating the step to run the SSIS package, you will probably have to go to the “Execution Options” tab and check the “Use 32-bit Runtime” box.

Hope this saves someone some time and headaches.